Title
Sufficient for Our Need
Striving for Self-Sufficiency in the Modern World
Monday, April 25, 2011
Seeds vs. Sets
I planted onion seeds for two varieties last autumn -- long red Florence and yellow of Parma. Rather than scattering seeds, I used my spacing template to plant 9 per square foot because the year before I tried to plant them close and found that it was too difficult to replant them later in the spring as sets. The Florence didn't come up as well this year as the Parma did. I attribute this primarily to voles or some other pest in the box where the Florence were planted.
But the bigger immediate question is how the seeds have fared so far when compared to sets. Because the Florence were spotty, I bought sets and planted them in the same raised bed. It allows me to make a direct comparison. The photo below compares the best Florence with 2 onions typical of those planted as sets. Not all the Florence are this big, but most are clearly larger than the onions planted from sets.
The Parma that were planted from seeds grew much more regularly and, overall, seem to be doing great. They are all tall and have developed nice thick stalks. It might be hard to make a direct comparison between the photos, but the Parma are uniformly as large as the Florence I captured above.
The conclusion is that I like seeds, at least so far. I have to figure out the pest problem and will move the bed where I plant next year if I can't kill the pests off.
Saturday, April 23, 2011
Orchard Report
I took a quick trip through the orchard to see how things were developing. I have two plum trees. I found fruit on one, the Methley, but not the other.
All three pear trees had fruit that was set.
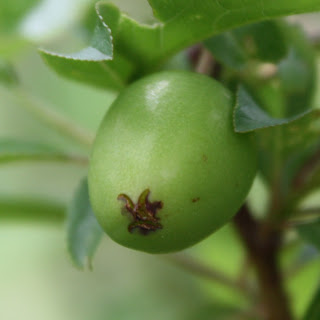
I have six peach trees. Some of the fruit was set. This image was from the tree that was furthest along. Others had very small fruit, just starting to show. There were two trees on which I didn't see any fruit.
One of the peach trees had very weak leaf development and no fruit that I could see.
The apples all had fruit that had set. I will need to thin these out quite a bit. I have yet to get really good apples off any of the trees. One died last year.
Also, not pictured, both the apricots died, but the root sent up new wood. I kept one sapling alive on each tree and cut off the rest last year. I don't think I actually have an apricot tree anymore, just whatever the root stock sent up. If I knew about grafting and where I could get apricot branches, I will address this for both trees.
The persimmon is alive and growing leaves. It's an odd tree, but seems to be coming on strong this year. I'm hoping it will find a central branch to make the trunk. Right now, the strongest branch juts off to one side.
What I don't know how to do is treat the trees for the problems they will all face. It is not crucial that I learn immediately, but eventually I need to learn how to take care of the orchard.
Friday, April 22, 2011
Winter Weeds
There are two kinds of weeds that seem to be very prolific in the garden starting in the fall and growing through the winter. They obviously drop seeds by the hundreds (because I don't get rid of them in time). There is a third and fourth type (not pictured) that I deal with as well, although the latter two don't grow quite as profusely. I ought to know the names of these, but I don't yet. (My purpose in blogging about them is not to complain about the weeds; they only grow because I let them. I need to learn a little so I can be better prepared.)
I've search images on google. The closest I came was for the plants with the purple tips. They may be purple dead nettles (Lamium purpureum).
I am still searching for the other plant in the picture.
Thursday, April 21, 2011
New Hearts
Given my poor judgment about transplanting the Hungarian Heart tomato seedlings, I thought I would try again. It would be a shame for me to lose out on learning about this new (to me) variety altogether. So I replanted. I ran out of the peat pots I used the first time. I bought new pots at Tractor supply. The new ones were a bit bigger than the ones I originally used, 3 inch Jiffy Pots that came 22 to a pack.
I planted 16 seeds. I put them in a bit deeper this time around because I noticed that especially for the Hungarian Hearts, the seed cover tended to stay on the first leaves. I figured thet planting deeper would allow the soil to help rip the seed cover off. All came up. Only 3 had seed covers still attached and they came off easily.
I've also tried something else with this batch. I purposely didn't fill the pots to the brim with planting mix when I started the seeds. As the seedlings grow, I will back fill the pots with soil until it reaches the top, allowing the seedlings to start establishing side roots earlier and giving the stalk a bit more support throughout the early phases. (I've noticed for instance that watering even at this stage knocks over some of the stems.) I've only just started this process. I packed a little planting mix around 5 of the plants this morning, adding only about 3/8 inch of soil to the pots.
Then I went out to the garden to clean out weeds and, to my surprise, I still had one Hungarian Heart alive in the bed. I am hoping this one will continue to do well. I will mark it as having hardy character and maybe take some seeds from it if it also does well as a producer.
Thursday, April 14, 2011
Queen Cells
Seven days ago I put two frames in the hive that originated from Doug Shaw's strongest hive. One was a super, one was a brood frame. I was pretty sure one of them had eggs or very young larvae. We went back in today, based on Rob Jacobs' advice to see if queen cells had been started. We found one on each frame.
The photos that follow are from the super frame. The queen cell is on the bottom of the frame, just like a swarm cell would be. I'm not sure exactly how the egg or larva got into that position, but the bees seem to like it there. There was one bee that seemed to be especially engaged with the cell. It took a little patience to wait until this nurse bee was through to get the shot of the open cell. This is good news!
The second frame, the brood frame also had a queen cell. This cell was more in the spot you would expect of an emergency or supersedure queen cell. I wasn't quite as impressed with nurse bees, but then caring for the queen cell may be sporadic or I may just have not seen it, I didn't want to be in the hive all that long.
The bees seemed very happy. There was plenty of pollen and honey. I am not feeding because they are close to a nectar and pollen source and there is no need for them to draw new comb.
I have two possible queen cells! May the best one win!
Wednesday, April 13, 2011
Dead Hearts
I believe in reporting failure. The Hungarian Hearts I planted are dead. Clearly too soon. It didn't get down to freezing, but they clearly didn't like the 40s and 50s F.
I planted 16 new seeds. I probably have a month before things should really be planted. I may just plant them a little late.
Saturday, April 9, 2011
Hungarian Hearts
The Hungarian Hearts were the tomato variety that suvived poor water the best. The problem I have seen with them over the past several weeks is an increasing loss of vatality in the leaf color. They are turning quite yellow. In the past, I've found the best remedy is to just get them into the ground and let them grow under normal garden conditions. It is a bit early in the season; the official last frost date isn't for a week or so. I checked the weather channel and they projected no frost for the next 10 days. Besides, I have a cover that I can stick over the top if things look really bad.
I tagged the ones I thought were most ready to go in the ground and put my McDonalds' straws on them for cut worm collars.
The last several years, I have put 18 plants in a bed. This year I am putting 16 plants in a bed. For one thing, I have expanded to three beds dedicated to tomatoes this year, so I will have space for 48 tomato plants instead of 36. This way, I can also use the cold frame conduit to help support the cages and each bed has 5 tubes -- 1 at each end to support 2 plants each and 3 in the middle that will support 4 plants each.
I turned the cages upside down to get my spacing.
I expect rain this afternoon, so I didn't water. We had a good storm last night and the soil was really good and moist.
The one good thing about the spindly seedlings was that I could bury them pretty deep. I understand that the little hairs will turn into roots, so I hope that part works out. I did have an accident with one plant. It's leaves broke off before I could get it into the ground. But, I started with 24 plants and had an extra. (I plan to give all the rest away to friends.)
One thing I do want to comment on, just for the record, is that a whole lot of weeds had grown up in the bed over the winter. This is a problem with several of the beds. The onions have already been weeded. There are 3 beds that I need to get to.
Thursday, April 7, 2011
The Bee Story
There are no pictures with this.
I posted a request on the Guilford County Beekeepers Association forum, describing my problem with the dead queen. Here is the text and several follow-ups:
Me: I picked up my package from the club on Sunday and installed it. At the time of pick up and installation, the queen was alive. She never made it out of the cage. I now need a new queen. I've called around. Local suppliers won't have queens until about May 1. There is a California supplier who has a 2010 queen for $20 plus $25 or so for shipping. I'm hoping to avoid that.
My current thinking is to combine the new package with an existing hive and wait until a queen becomes available locally when I can split the hive again. Any opinions? Any other options?
Ski: An option would be to put a frame of brood with eggs in the package hive and let them raise their own queen. Drones are available now so 16 days plus from now should provide that many more mature drones. But I have not played around that much with packages.
Wally: I would go with the frame of eggs, but leave the bees on it. There will be a little fighting at first, but they will settle in shortly. The extra bees on the frame will give the package a boost.
Me: I went in with my buddy Doug and looked through three of his strongest hives for a frame with new eggs. All of his queens had chimneyed with brood in the brood boxes as well as in the supers. We found the queen and, avoiding the frame she was on, picked a brood frame and a medium with very young larva as well as some young ready to hatch.
I replaced a brood and medium super frame in the new hive. The packaged bees had drifted to port in both the brood box and the super, so I placed the new frames a little to starboard, hoping they would accomodate more easily. (I had some loose bees in the nuke box I carried the frames over with, so I just dumped them on top and wished them luck.)
So, now I wait. Any more advice?
Jacobs: You can give it about 4 full days and then look for queen cells. You should see them by then. If you have other bee hives around (and maybe even if you don't), you may want to use blue or green painters tape (the kind that you can pull off without leaving glue on the hive or pulling up paint) and put it on the front of the hive in wonky patterns. This may help the queen recognize and get back to the right hive when she orients and goes up for her mating flight. The link below is to Michael Bush's bee math. It will give you an excellent idea about what you should be seeing when.
http://www.bushfarms.com/beesmath.htm
So, that's where it stands.
Wednesday, April 6, 2011
A Dead Queen
The queen was alive when she was installed. She never made it out of the cage. I think we need to reconsider the bottom loading-on-a-stick method.
There are no queens for sale locally. None will be available until about May. Doug and I will deal with this in one of two ways. We could combine this hive with one of his until a queen becomes available and we can split it out again. Or, an option posted by one of my fellow beekeepers is to take a frame of newly laid eggs and let the bees make their own queen. I like the last option best.
Sunday, April 3, 2011
New Bee Package
The new package of bees arrived today. I purchased it from the Guilford County Beekeepers Association. I think they got the packages from Georgia. I'm not thrilled about that. I have developed a belief in local bees. But, I decided to take what I could get.
I am putting the bees in Clarence's yard again. The one thing Doug Shaw suggested was inserting the queen cage into the hive in a different way that he had read about recently. We parepared the cage the same way you normally do by taking out the cork and poking a hole into the candy. What we did differently this time was to attach a bamboo shaft to the side of the cage. We wired it on. I guess a rubber band would have worked as well.
Then we put the cage at the bottom of the brood box. The idea will be that we won't have to open the hive by taking off the super to check the release of the queen and pull out the queen cage. We can just pull the bamboo stick out to do that.
The other thing we did was to reloacte the hive a bit. It used to be in the shade a bit more than I liked. So we moved it into the sun and angled it to the south east.
By the time we left, the bees had already oriented and were starting to go after Clarence's holly bushes that have just come into bloom. The good thing about this installation is that there was already pollen in the hive and all the frames were fully built out so no new wax need be created. They can just start storing nectar and making honey.
Saturday, April 2, 2011
Aargh Update
To be brief, after watering and waiting, all of the John Baer seedlings that were drooping have more or less recovered and are alive. I have given many of them shikabob skewers to rest against, but their leaves have all revived. All but 6 of the Italian Heirloom also revived. The 6 that didn't are probably done for and I will need to replant.
Aargh
It always happens. You think you are doing your best and then you goof up. My tomatoes were coming along just fine. I thought that by turning on the fan, the stalks would thicken up a little. I went in on Wednesday and examined. Things were a little dry so I watered, giving about 2 quarts among the three planters. (I actually bought a 1/4" line so that I could syphon water from the pitcher and control its flow more easily. The syphon worked great. It just needed to work more.) The plants in the top photo are the Italian Heirloom.
But then I went in this morning and felt that sinking feeling in my chest. Two of the three plantings had gone totally dry and the tomatoes had started to (or completely in some cases) keeled over. The soil was totally dry. Of course, the fan is the culprit, but it is my lack of diligence that is the real problem. Seedlings cannot be ignored and I had ignored them. The plants in the center photo are the John Baer. They are the ones that have had the greatest problem in color -- the leaves have a yellowish tint.
Amazingly, the Hungarian Heart (in the bottom photo) seemed to do the best. The soil was just as dry but they had not wilted. I guess their point of catastrophe is a little different than the other varieties.
I immediately gave each bed water, about 2 quarts each. I turned off the fan. I will give them a while to see if some respond. I will replant where I see that a seedling has died. What else can I do at this point?
The ten days we were gone on vacation with the fan off, nothing bad happened. Just a few days with different conditions changed everything.
Friday, April 1, 2011
Wild Turkeys
This really has nothing to do with having sufficient for our needs, but I thought I would document it anyway. Everyday, I drive down a country road on my way to work. I've periodically seen wild turkeys as well as buzzards near the road. It is pleasant to think that I live in a place where there is still ample wildlife. Of course, there are plenty of deer and raccoons and occasional foxes and coyotes as well. But the birds are the most interesting to me.
I have noticed that there is a rafter of turkeys that have stationed themselves in one field in particular in the mornings. I took the camera with me today just to get a photo. I have noticed in the past couple of glances that some of the turkeys have a whitish shade to them. I wonder if the wild and domestic have been intermingling. I like the fact that in this photo, the tom has his tail feathers spread. When I got there, they were already heading off to the left into the woods, where I take it they hang out during the day.
The irony of this is that there used to be a turkey shoot very close to this field. We used to pass men out with their rifles in the evenings raising funds for a local Civitan organization. They weren't shooting turkeys, just targets. I wonder if they knew how close they were. Perhaps the turkeys stayed away until the shooting range got taken down this last winter.
Subscribe to:
Posts (Atom)