Title

Sufficient for Our Need
Striving for Self-Sufficiency in the Modern World
Showing posts with label food storage. Show all posts

Sunday, August 18, 2013

Wet Weather and Tomatoes


I'm sure there are plenty of people in my neck of the woods who have had success with tomatoes this year, but the common complaint I have from friends is that it has been too wet and tomatoes have not done well.

After last year's dismal tomato harvest, I was committed to not even try. Last year was the year I tried to dedicate the garden to growing heirloom varieties. They just didn't do well.

This year, I wasn't even going to plant any, but Kathy wanted some. So we went to the Farmer's Market and bought some hybrids. I have since looked and I can't find the labels that state what variety they are. All I know is that we bought a four-pack of one variety and a single of another.

Given the few plants we have had, I was surprised the other day to come home and find that Kathy had enough tomatoes to can some. And the plants continue to produce.


I understand the theory of growing heirloom varieties. Heirlooms can be grown from your own seed year-after-year-after-year. But here's the deal, the hybrids are doing well. I also understand the theory of growing tomatoes from seed. You gain important understanding about self-reliance when you grow tomatoes from seed. But the deal here is that what we planted took a lot less energy and made a lot less mess than going the heirloom route.

Sunday, August 11, 2013

More Sunflower Processes


What I have read about processing confectionery sunflower seeds is that you can separate husks from the edible part of the seed by running them through a stone mill. We happen to have a stone mill. We bought in the 1980s to grind wheat. It doesn't have a motor, just a hand crank, so it's not the preferred method to do just about anything. Still, for dealing with sunflower seeds, it seemed appropriate.

The method I read suggested opening the aperture of the wheels a bit, between and eighth and a quarter of an inch and grind away until you get seeds separating from husks. The stones are, indeed, adjustable. For me, it seemed that about an eighth of an inch worked well. As I turned the wheel and ground the husk, the seeds separated quite nicely. The photo on the left below is the result of processing a half filled bowl of seeds this way.

What is apparent from this is that the stone mill grinder does its job. Both parts fall down through the shoot. Clearly, this makes it easier to crack the seeds. What it doesn't do is separate the two parts. I ran one small batch through and sort of used a combined method of hand picking out the shells and blowing on the bowl lightly to see if that would separate the parts. It worked, but it was time consuming and messy. I had to do it outside and my shirt ended up covered with small bits of shell. The one problem I tried to avoid was loosing seed because I blew too hard. I'm not sure how effective it was.

I added a step with the larger batch of seeds. I had some quarter inch screen left over from another project. I first put the batch of cracked seeds on the screen. I actually tried to do too much at a time and so I had to work it around a bit. The screen caught the very biggest pieces of shell, about a third of the total batch. I dumped the part that was caught and did it one more time. That left about half of the total batch in the bowl below and, as far as I could tell, didn't leave any of the seeds on top of the screen. After this, I went outside and did my gentle blowing process again. Finally, I hand picked out the few remaining pieces of shell and whatever the other things were. The photo on the right is the result.

One thing is for sure, there isn't a lot of seed that results. It would take a lot of sunflowers to make a quart of seed. I understand now why you would need to dedicate acres to growing and good equipment for harvesting and processing if you wanted to do this economically. For us (well, me) this is just an experiment to learn about self-reliance. It's mostly just humbling to know how cheaply I can buy this stuff in the store.

Friday, August 9, 2013

Processing Sunflower Seeds


This is our first attempt at doing something with sunflowers. After I chopped the heads off (sounds a bit like the French revolution!) I put the sunflowers in the garage to dry. It might be a bit humid in our garage, but it is also quite warm in the summer. Mostly I think we just needed them out of the house and in a place where birds and other vermin wouldn't have access to the seeds.

After a couple of weeks, the backs on some turned yellow and the leaves all either fell off or shriveled. I brought them in the house and Kathy, Jenna and I used our thumbs to get the seeds out. It was a bit more time consuming than I expected. I thought they would just fall out. Instead, bending the flower and rubbing with your thumb seemed to get them to pop out, at least for the most part.

Kathy soaked some over night in brine and then baked them. The first batch were burned. The second batch was just great.


Sunday, August 4, 2013

Grape Jelly

In years past, we haven't had too much production out of the grape vines. Not that we worried to much about it. The seeded variety that I planted aren't much good as table grapes. By the time I usually got around to seeing how they were doing, they had mostly been eaten by birds. I don't think there were all that many clusters at any rate.

What is different this year is a 20-month old grandchild who loves to go out into the 3+ acres we call our yard and just run as far and as fast as he can. He thinks it's a game. Run and see if granddad will follow! We haven't visited the grape vines much in years past because it takes a bit to walk to them. But this year, that's were Matt headed and we followed.

I wouldn't call it a bumper crop, but clearly we had some grapes. So I went out and picked what I could. Then, I realized, we actually hadn't planned on doing anything with them. I just left them on the counter and Jenna, permit in hand, for a drive. (I believe in North Carolina's graduated driving system, but it means a lot of hours just driving around.)

When we returned, Kathy had sorted out the good from the bad and had washed and cleaned. Shortly after that, she had the good stuff simmering in a pot with the required amount of water. I joined in and used the food processor to strain out seeds and skins. Shortly after that, it was time for the pectin and sugar and a bit more boiling.

We had enough rendered jelly to just about fill 4 quarts-worth. We are almost out of canning bottles. We had 4 jelly jars and some pint jars left. The people I've told about it asked if we used a low-sugar recipe. (Thank you all for concern about my diabetes!) No, we used what the recipe called for. My guess is that you don't eat tablespoons full of jelly at a time. The last thing we tried to can as a preserve, peaches, didn't turn out well as a low-sugar product. Of course, the other thing we did this time was to boil the mixture until it was clearly ready to be put into jars.

This evening will be the test. We have some home-baked bread on the way -- the perfect medium on which to test it.

Sunday, July 28, 2013

Start of the Sunflower Harvest


Jenna was home for a day from her summer camp. While she was here, I thought we should start harvesting the sunflowers. Most of the Mammoth variety are still not quite there yet, although we did harvest one head. The Lemon variety were much more ready. In fact, the birds had already done a decent job on a number of the flowers. Still, we harvested more than a dozen flowers that seemed to have a number of seeds still in them. The Lemon variety have multiple flowers per plant. The Mammoth have only one, but it is much larger. The photo is of Lemon variety flowers.

The plan is to follow what has been published. The flowers now sit in a paper bag, waiting for them to dry.

One thing I have noticed is that the seeds all seem to hold to either the confectioner shades of gray and white or the oil producing shades of black, like the one in the lower right of the photo. In theory, all of the seeds planted this year were confectioner. My reading suggests that we may actually have a mixture of oil bearing and confectioner types.

Saturday, July 27, 2013

Canning Potatoes


If you ask, "Is it worth it to can potatoes?", the answer is probably, "No!"

In fact, you could probably say the same thing about growing potatoes in a home garden. Economically, there isn't much point. Potatoes are cheap and plentiful and of high quality in any grocery store.

This year's potatoes were planted cheaply. I had some Yukon Gold seed given to me by Denise Stafford. There weren't many, but it was what was left over from what she had planted. I also planted some Russets that had gone to seed in the pantry and some Reds that were of the same ilk. So, the planting was cheap. Essentially, it didn't cost me anything more than the effort and the ground. As a home gardener, I think it is better to be growing something in a garden spot than letting ground go unoccupied, so there might actually be a plus to having planted.

The harvest was honestly a bit skimpy. The Yukon Gold produced nice large tubers for the most part. The Russets and Reds were small. We used some in a few clay pot meals with chicken and some hash browns. There were still quite a few left over. My experience has been that potatoes in North Carolina don't store for very long. Too much humidity and heat. So, instead of just bagging them, I thought I would can some of them this year.

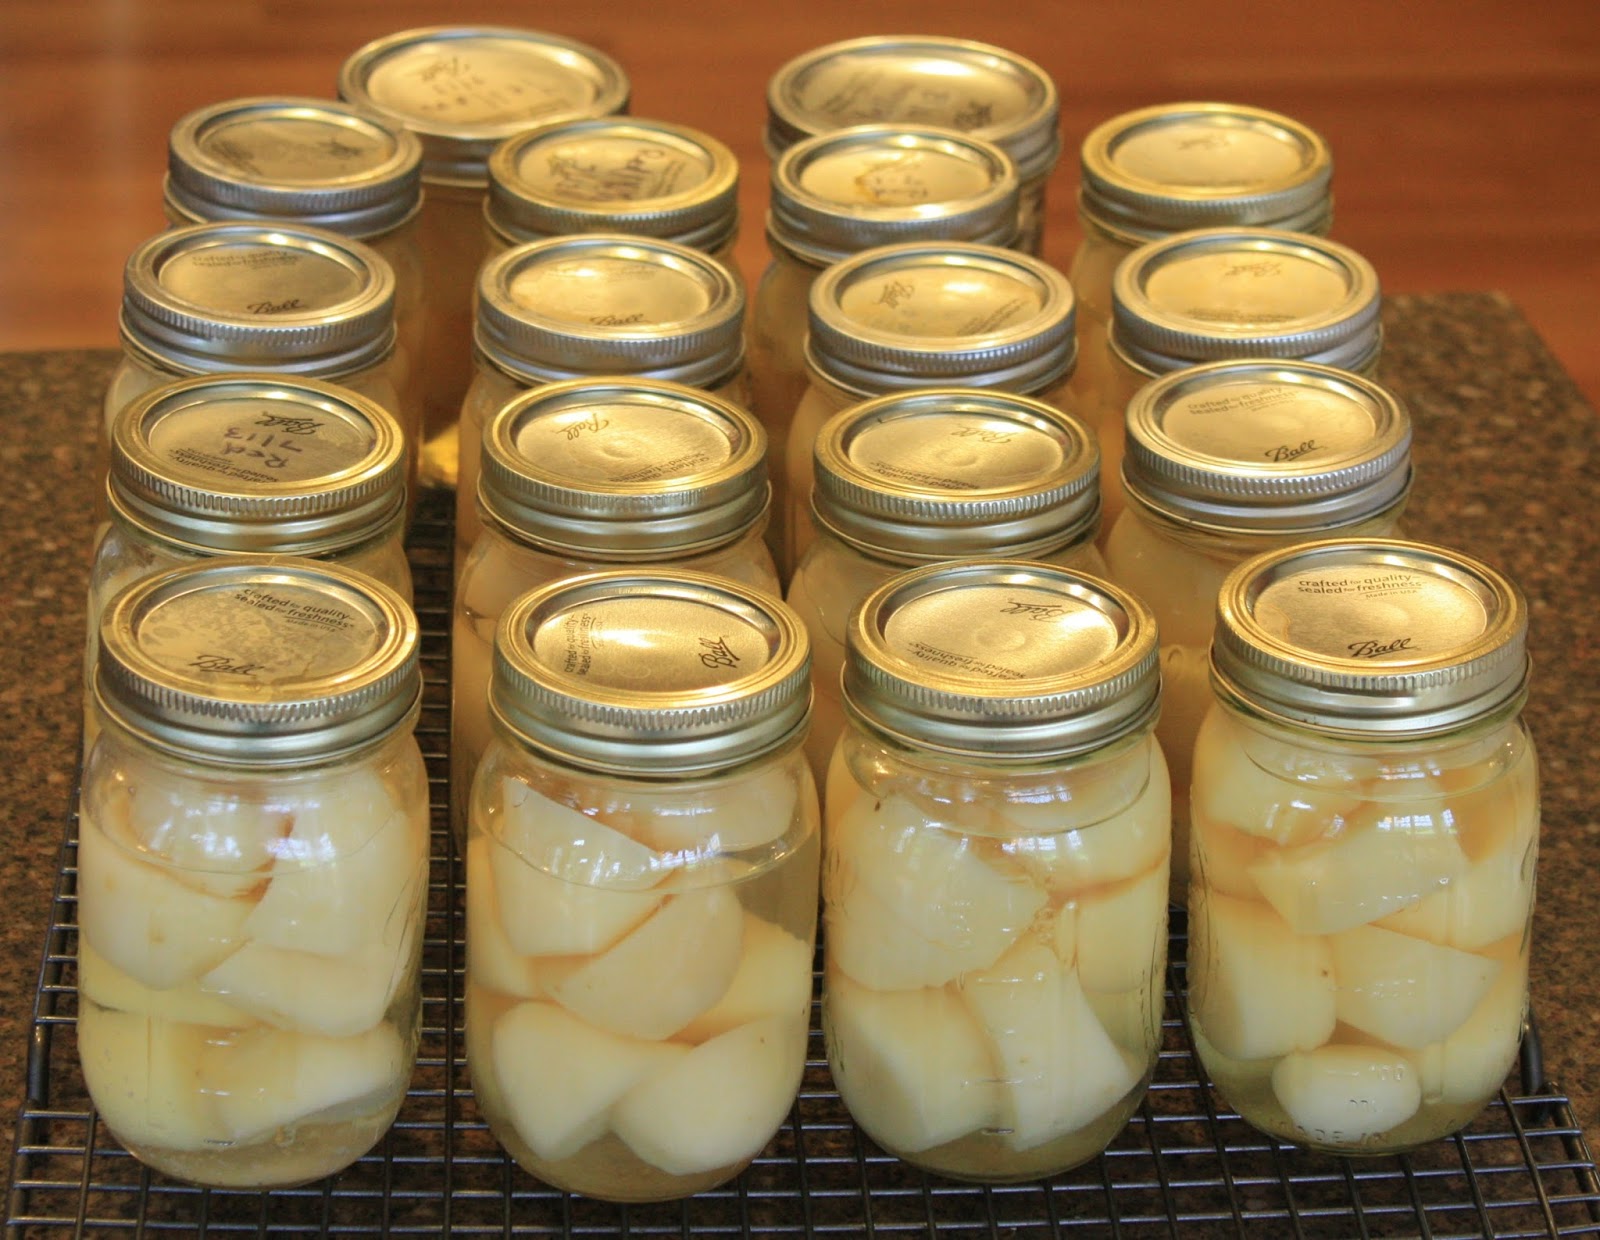
I bought a 23-quart Presto pressure canner. Kathy said it came 32 years late. But we now have it. I peeled for about an hour this morning. Small potatoes are a pain to peel, in case you couldn't figure that out. It made 18 pints and so far, have seemed to turn out OK, except for a few bottles that have too much air in them. Guess we should have tightened the lids a bit more. At least it appears they came out better than the pickles, which should have been canned a different way owing to the fact that I didn't understand the canning directions and over cooked them.

I'm not sure how we use these. We certainly couldn't survive on just our produce from the garden, but there is a sense of accomplishment in doing something.

One thing I learned is to not wait too long to harvest. This year, I kept the Reds in the ground a couple of weeks later than all the others. Too long in the ground tends to lead to some sort of decay.

Monday, July 15, 2013

Adventures with Garlic


Jared told me he missed by blog. It's been a very long time since I've posted anything. When Kathy asked me about it, I claimed having just too much failure. And there has been plenty of distraction. I think I essentially quit trying to garden last year, so there was nothing to write about. But this year, I got busy again. So, my first new post is about garlic.

I ended up with a fair amount of garlic from last year. It hung braided in the garage all winter. Then it started to sprout. I tried saving some of it and took the cloves that hadn't sprouted and dried them in the dehydrator. I used the garlic press to squeeze out what I could and then either took it as it was or used a rolling pin to make it into powder.

But, then I still had a lot that had gone too far into sprouting, so I put some out on the street with a sign inviting neighbors to take it and plant it, gave it away to people at church to plant, and then planted about 20 or so cloves myself. Garlic should be planted in the fall, not the spring, so it was just an experiment. I had actually also planted about 7 or 8 cloves last fall. The fall cloves were large. The spring cloves were small.

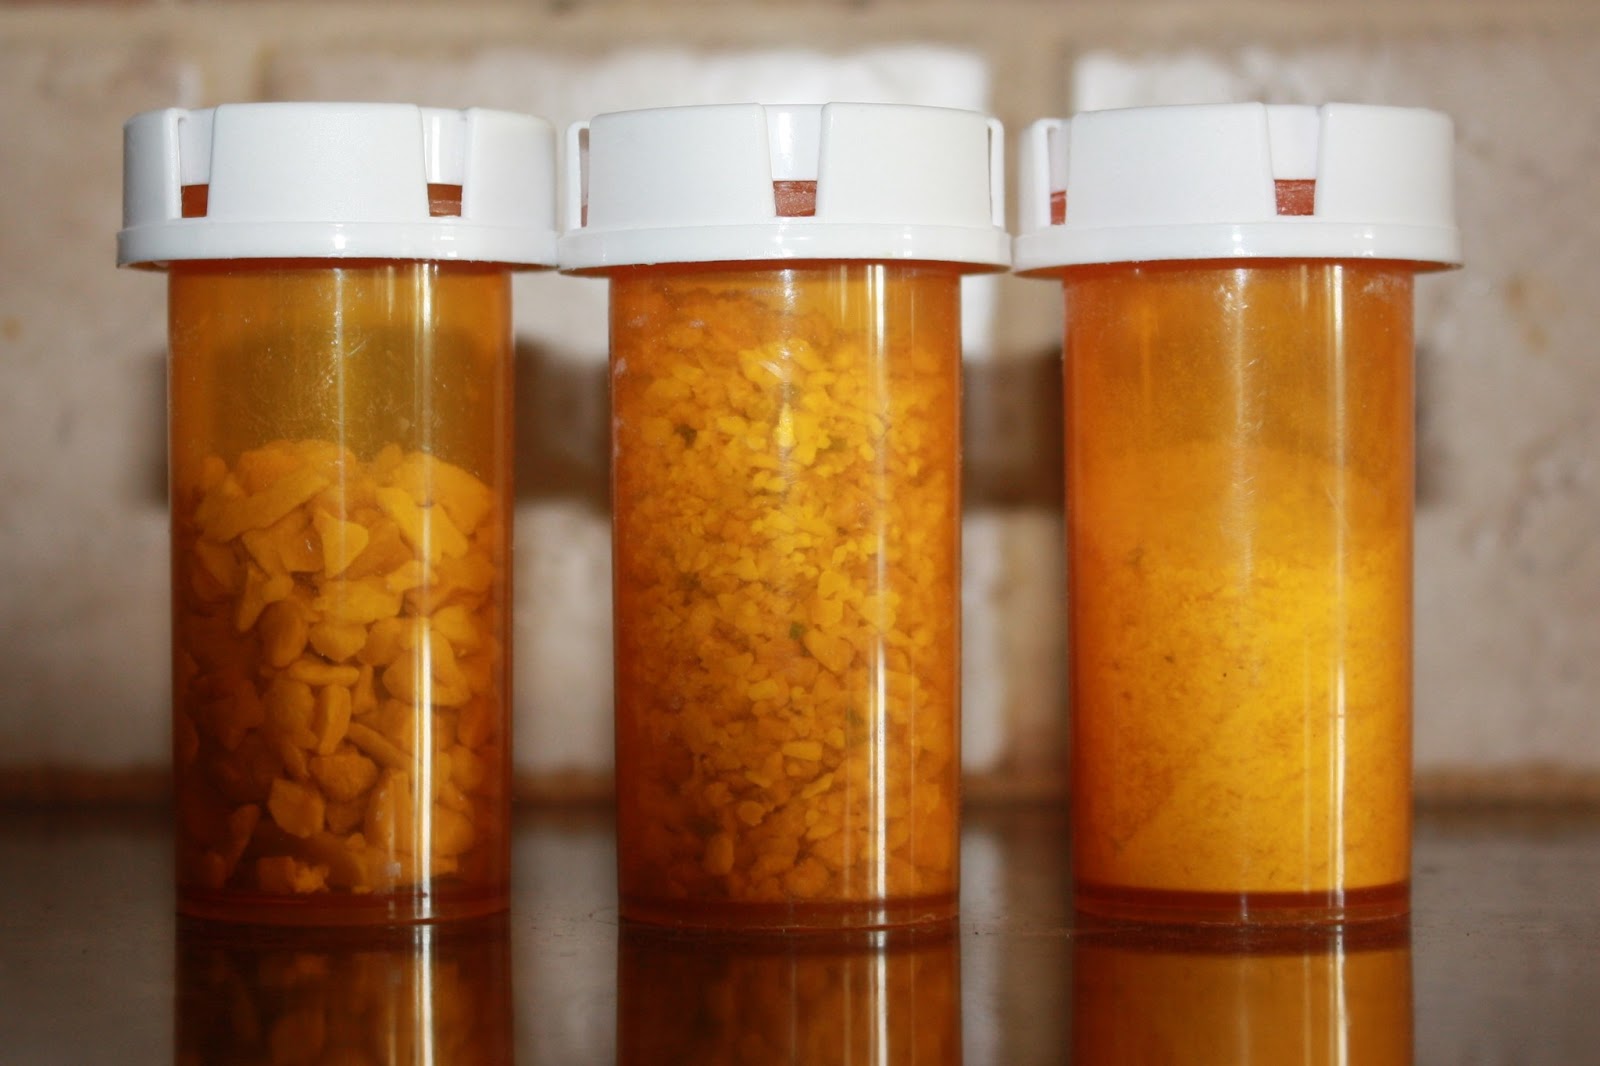
Still, you have to do something with the cloves. And given that my last year's bumper harvest all sprouted before I could use them, I decided to take a couple of the big cloves and see what I could do. My first attempt is shown here. I cut the cloves in half and then dehydrated them.. Then i tried to grind them up with a mortar and pestle. Probably the wrong approach. The dehydrated cloves were tough as nails and didn't break up easily. I ended up using a knife to make them smaller.

I did end up with three sizes -- rather large chunks of garlic, smaller chunks of garlic (more like what I think of as minced) and powder.

Then I read that the smartest way to store garlic is in white vinegar. The value is that you only have to get the clove out of its casing. That in and of itself is a little sticky. Although I learned that for many cloves, you can sort of squeeze from the top and the clove will separate from its skin nicely. So, I separated a couple of heads of garlic and stored them this way in a cup-sized jar. The recipe I read said the vinegar doesn't really penetrate the garlic. You just wash it off before you use the clove.

I finally harvested the remaining garlic that had been planted in the spring. The heads were smaller and the cloves were smaller, but I was able to get another three cup-sized jars out of the plants. I canned the jars just like I would anything else. Two of the lids sealed. Two didn't.

There were some cloves left over, so I chopped them up and dried them. They were easier to deal with in terms of getting powder and minced garlic than I had experienced when I tried the same process with the garlic that I had only halved. So, next time, if I want dry garlic in any form, I will cut it up first.

I like growing garlic. It grows well. I don't mind having too much of it. I can always give some of it away.

Friday, June 8, 2012

Peaches Preserved


Kathy and I did our best. We intended to create peach jam. I think we came closer to peach syrup. The end result is a little more liquid than either of us envisioned. I think the problem was that I didn't search for a low-sugar recipe and I probably didn't get the right kind of pectin. (Neither of us is sure what pectin has to do with making jam, but I suspect it is important.) We have four more trees coming.

The problem you run into dealing with fruit, is that it has to be processed right away. The peaches had started to go over-ripe quickly once they were inside. They may have done the same outside, but their status becomes noticeable inside once they are picked. I think things would have been better if we had been able to plan ahead. But, one of the reasons for doing all of this from my perspective is to learn what to do better the next time.

I do have to say, though, the peaches tasted really good. Fresh fruit is best.

Saturday, October 29, 2011

Green Beans


It is starting to turn colder. I think it will freeze in the next few days. With that in mind, I decided it was time to pick all the green beans that had grown in the one bed that I planted back in August. In the two and one half months since then, I really haven't given them any mind. Last week we picked a few for meals, so I knew there would be some to harvest. Jenna and I picked about a bushel and a half today.


We pulled out the Seal-a-Meal. It would be nice if we didn't have to par boil and do other things to process the green beans, but that isn't in the cards today. We will dehydrate some too (because Kathy wants to try that).

I spent some time before that continuing to weed the onion and garlic beds. Pesky little weeds just keep coming back. These are winter weeds and won't be deterred by the cold, so it will continue to be a task in the weeks to come. At least I got is so that the onions and garlic are not surrounded to the point where they will get choked off.

Saturday, August 13, 2011

Tomatoes in the Pantry


For us, tomato season is over. The leaves have all gone small, then spotted, then brown. There is no more (or at least very little) fruit that has not turned orange or red and been harvested. And, I think I can say it without offense, Kathy and I are tired of canning tomatoes.

I took stock of what we have in the pantry. There are 34 quarts, some of it in pint jars, of canned tomatoes. We have 4 quarts of chili sauce, a quart of spaghetti sauce, 3 quarts of tomato sauce, a quart of tomato paste, and a couple of quarts of tomato juice. It hasn't been a bad year.


I have also saved seeds. I used a fermentation method I found on the web. I saved, Hungarian Heart from the one plant that survived early planting. I also saved Italian Heirloom, John Baer, and Rutgers. The Rutgers didn't grow well, even though I planted pretty hardy looking plants from the Farmer's Market. I hope I don't have wilt in the bed they were planted in. Next year, I will have to plant them in a different place. I think that for canning, Rutgers and Italian Heirloom have been the best. If the John Baer would just get a bit bigger, they would be very nice because they have small stems and easy to remove skin.

Sunday, July 31, 2011

Chili Sauce


I harvested more tomatoes yesterday, a shopping bag of Italian Heirloom and one of John Baer. With the John Baer that were in the refrigerator from last week, we had about half a bushel. We now have a fair number of quarts of canned tomatoes. I thought it would be good to make something else. I remembered loving my mother's tomato chili sauce. Of course, it is always the case; the recipe you want from your mother went with her when she passed.

I found the following recipe on cooks.com.

1 peck tomatoes
9 green peppers
6 med. size onions
3 c. sugar
3/4 c. salt
1 doz. med. red peppers
1 qt. vinegar
3 tsp. cloves, ground
3 tsp. cinnamon
2 tsp. nutmeg
2 tsp. ginger

The half a bushel of tomatoes meant we had two pecks. Kathy wants one for straight tomato sauce. So I did the homemade chili sauce. I substituted 2 poblano peppers for the med. red peppers. Then cooked it for at least four hours. It yielded 10 pints.


If I were to do it again, i might cut the spices and vinegar a little. It is pretty strong stuff. And I don't think it is a full duplication of what my mother made, which was pretty mild by comparison. Still, a generally good use of extra tomatoes.

One last comment: This allowed us to compare the processing differences between the John Baer and Italian Heirloom varieties. The Italian Heirloom are much, much larger. But, they are also a bit more unwieldy. The skin of the John Baer just slips off when parboiled. The John Baer also have less pith in them, making it easier to keep most of the fruit when you take out the stem. They just don't grow as big. They also tend to bleach when they get too much sun.

Thursday, July 28, 2011

Processing Tomatoes


This is the time of the year when tomatoes get ripe. It's pretty obvious, but it always catches us a bit off guard. Because it's not just that they are ripe, it's that they must be processed while they are still in their prime or they are wasted.

Kathy went to Toronto last week in the midst of the period of first ripening. I grow the food, but I can't process it without her. Not that I couldn't, I just find myself adrift trying to manage it alone. It is a team task. Fortunately, before the fruit went bad, she returned and we got busy. This is actually the second batch we have processed. The first batch, which we did just before she left, we skinned and put into quart-sized tubs in the freezer. What is pictured below represents a little more than we did then. I also got some tomato juice out of the left over drippings. Pretty tasty stuff!


There are more to do. We had a bumper crop of Italian heirlooms, most of which probably weighed a pound each. You can get a lot done with fruit that size. The tomatoes pictured below are John Baer variety. I was afraid that nearly all would be lost to blossom rot, but somehow, the majority of fruit I have seen lately has been in pretty good shape. A few blemishes, but not the terrible signs of rot. There were a lot more fruit by numbers, but about half the total volume. I think we will process these into something different. I would love to duplicate my mother's chili sauce. There is no recipe so I need to search around for one. Hers was not spicy in the least, so I am trying to figure out what she had in it.

Saturday, July 23, 2011

Blooming Onions


It has been so hot, I have had low motivation to do anything in the garden. Of course, this time of year, you have to pick zucchini daily or they grow too big. I've given up on the yellow squash. I keep wondering why I planted it! Any, there are plenty of tomatoes coming ripe. The Italian Heirloom have done the best, with consistently large fruits of about a pound each. We put some in freezer containers this past week. I'm not sure of the texture or the taste of these yet. We have to try cooking with them first.

One task I have been avoiding has been cleaning out the raised beds that had onions. This morning I finally decided to work until it was too hot to continue and clean out the bed where the yellow of Parma had grown. I clipped off all the blooms. They filled two plastic grocery bags. I'm going to have more seeds than I know what to do with. I guess I will send the ones I don't need to Seed Saver's Exchange. Many of the blooms are not yet ready to release seeds, so I put the blooms aside. However, seeds were dropping from some of the blooms. I got about third of a cup of onion seeds, which I cleaned up a bit by sifting them through a colander.


I presumed originally that the bulbs on the onions that had gone to bloom would be useless, but, as I picked them out of the bed, I realized that the bulbs on many were still rather large. So, I decided to process some.


I extracted the stalk from which the bloom grew from the middle of each and, for some, I chopped the onion up, for others, I cut them in quarters. I got about six quarts to freeze. Putting my work in the freezer, I realized that we still had frozen onions from last year that we haven't used. So, I stopped with six quarts and decided it was too much work. I think I have the best there was to offer anyway; the ones I didn't process were rather small.

Tuesday, September 14, 2010

Tomato Harvest


The tomato harvest turned out to be a bit disappointing this year. Given all the plants, I expected that we would have between 30 and 40 quarts by the end of the season. It just didn't happen. We ended up with 15 quarts and a pint. (Kathy did all the hard work of actually doing the canning.)


Here's what I think I learned from this season. First, variety matters. The best producers, accounting for about half of what we stored, were Rutgers tomatoes. I only planted 6 of these plants, but they produced very well. The Marglobe split, were of a very uneven size (some more like cherry tomatoes). I only harvested a few Brandywines because the birds and worms got to them. Next season, I will try a mixture that will include Rutgers and maybe a hybrid just for the table.

Second, I've got to learn to control blossom rot. Dolomitic lime is cheap. I will double whatever I put into the beds this next year. The newest bed where the Rutgers were planted never experienced blossom rot at all.

Third, I've got to figure a better system for staking. The storm we had a while back had strong northerly winds that toppled all of the cages. I am still thinking about how to solve this.

Fourth, I won't plant as close next year as I did this year. I had about 15" between plants. I think 2' will be better. Essentially, as I finally get more beds, I will spread the 36 plants from this year into 3 beds instead of 2.

Thursday, September 9, 2010

Pears


The pear trees are only two years old (at least planted in my yard), but they produced a decent crop of pears. I don't know what the off color spots are caused by. I guess some research is needed.


I harvested the pears several weeks ago to try to avoid damage by birds and bugs. I probably picked 20-30 (I didn't count and I didn't weigh them). They half filled a paper grocery bag. I let them sit to ripen. We waited a bit too long. By the time we got to them, half had spoiled. Kathy canned the good ones, getting about two quarts. Still very tasty.

Saturday, June 26, 2010

Pickles Etc.


It didn't take long for Kathy to turn cucumbers into dill pickles.

I spent the morning planting seeds for salad cucumber, cilantro (saved from last year's harvest, so we'll see how they do), zucchini, and yellow squash. I added two carloads (about an eighth of a yard) of composted manure to the bed. This is the bed from which the Russets were harvested. It needed a bit of compost, probably more than I gave it.

I also planted Basil with the new bed of tomatoes. I bought some tomato cages so that now all of the new tomatoes has a cage. They were $4 each and it reminded me that growing our own is not necessarily the least expensive. My older friends who are much better at this than I am use wooden stakes. I don't know if they use new stakes every year or how much time they spend tying the stalks up. I've just opted for the wire cages. And I reminded my self that the purpose of this gardening venture does have benefits, just not economic ones. We get fresh food. We are better prepared for hard times should they come to our family. We are learning skills that, being the product of an urban youth, we weren't blessed with naturally. And, the last thing of note is that the other things we spend our money on are more expensive and less sufficing.

Thursday, June 24, 2010

Onions Step 3


Step 3 of processing onions is cutting off the bad stuff, dicing, and freezing. The onions for the most part are either small, which means that it takes a lot of time to get a little bit done, or they have heat spots where they got too warm when I dried the roots and stalks and started to cook in the field. Kathy and I worked through about 20% so far. At least we will have onions to cook with. We are storing them either in Food Saver bags or Ziploc bags.

I ordered new onion seed from the Seed Savers Exchange. More of the long red Florence and Yellow Parma. Last year I thought I would start the seed closely spaced and then transplant. It didn't work. I never transplanted because the pattern was too random. This year I think I will just plant them like I want them to grow and make sure the seeds sprout.

Monday, June 21, 2010

Onions Step 2


Last year, I left the onions in the ground too long and then left them out too long in the sun. I may have committed the last error again this year, but not the same extent. The constraint was that I picked on Friday and couldn't get back to them until Monday and Sunday and Monday were very hot days. In the end, you get what you get and I think I will have plenty of onions to process.

My next step (just to keep it for the record) is to bring the onions into the house, chop off the stalks, clean them up a bit, and then stick them in the refrigerator until I can get back to them for Step 3.

One of my unofficial readers, Pat P., suggested that next year, I might want to either plant onion plants (not sets) or plant seeds. I think I am likely to try seeds this fall if I can find some and let them grow over winter. The onions I am holding in this picture were planted that way. I got seeds from Seed Savers Exchange for the long red Florence variety of onion. These were the largest onions in the garden. The problem I had last year with the onion seeds I planted was very spotty germination, but they were planted with poor cover. I think I can do better this year.

Thursday, March 25, 2010

Who Needs Horseradish?


Kathy and I finally processed the horseradish from the garden. Wow! It's not so much the fragrance as it is the effect the chemicals have on your eyes and lungs. I'm not sure sting is the correct term.

We peeled the skin off the roots, rinsed them, and put them in the Cuisinart blender with the blade. I think it was the chopping that released whatever it was into the air. We processed about 3 cups, which in horseradish terms is a lot of horseradish.

Kathy found a prepared horseradish recipe online. I'm not sure which site she found the recipe at, but it had these ingredients and proportions.

They don't sell jelly jars in March in any of the local stores, so we put it up in pint jars -- two and a quarter. We may subdivide later.


Now, something to put it on. . .

Wednesday, February 17, 2010

Moths Aplenty


I've tried swatting at them and putting all our food in sealed containers, but the moths persist. However, I noticed the other day that there was a bug trap in the top of the pantry. It was very old, but it looked like it had done a decent job at catching things, so I ordered some new ones through Amazon.com. The traps (Xlure R.T.U.) come in six packs and aren't necessarily cheap.

The lures come in a resealable package, a necessity because it they operate by releasing pheromones that attract moths who think they are going to get free sex. I thought I would have just a few moths that would immediately swarm to the lure, and that would be that. What happened instead was that I had about 20 moths immediately start swarming, but none went to the lure; they just came out in the open. So, the first thing I learned here was that I had a lot bigger moth problem than I imagined and that I would probably need to let the lure just sit there for a while. My presumption was that the pheromones were so strong that they actually disoriented the moths and that they couldn't follow the scent. I figured that was still OK because being disoriented may have meant that they weren't going to jump at each other and reproduce.

So, I waited a few days before I looked inside the trap again. (The trap is a box that has four interior sides that are coated with sticky areas to hold the moths who venture inside.) There were moths stuck to the bottom interior surface; maybe 20. So I rotated the lure so that what had been the ceiling now became the floor and waited a few more days. Again, about 20 moths were stuck to the bottom surface. Next, I put one of the sides on the bottom and after a few days rotated it one more time.

Each lure is supposed to work for about eight weeks. After looking at it, however, I decided to just get rid of this one and start a new one. So, as you can see in the photo, I caught between 60 and 80 moths. (Each little blip on the surface is a moth.) I hope this is getting rid of them faster than they can reproduce. It is certainly getting rid of them faster than my swatting.